6 Excel Data Validation Examples You’ll Actually Use (2026)

In the world of spreadsheets, data integrity is everything. Inaccurate or inconsistent entries can cascade into chaos, causing failed formulas, skewed reports, and hours of frustrating cleanup. This is where mastering Excel’s Data Validation tool becomes a non-negotiable skill. It acts as a gatekeeper for your cells, ensuring that only the right type of data gets in, effectively preventing errors before they ever happen. Think of it as the ultimate proactive measure to safeguard the reliability of your datasets, from financial models to project management trackers.
This article moves beyond basic theory to provide a deep dive into six practical excel data validation examples. Each example is a self-contained guide, complete with step-by-step instructions and strategic analysis to help you apply these techniques immediately. You will learn how to implement:
- Dynamic drop-down lists
- Strict numeric and date range controls
- Text length and format rules
- Complex custom formulas
- Advanced dependent drop-downs
We will also explore how a tool like Elyx.AI can automate and enhance these validation rules, transforming a manual setup process into a streamlined, intelligent workflow. By the end, you’ll have a robust toolkit to enforce data consistency, improve accuracy, and save significant time. Let's get started.
Spending too much time on Excel?
Elyx AI generates your formulas and automates your tasks in seconds.
Sign up →1. Drop-down List Validation
The drop-down list is arguably the most fundamental and widely used of all excel data validation examples. It constrains user input to a predefined set of options, effectively eliminating spelling mistakes, formatting inconsistencies, and invalid entries. This method is the cornerstone of building clean, standardized datasets by replacing free-form text entry with a controlled selection menu. It's an indispensable tool for anyone creating templates, forms, or shared workbooks.
This validation type is perfect for scenarios where the possible entries are finite and known. Think of selecting a project status ("To Do," "In Progress," "Complete"), choosing a department from an HR form, or assigning a product category in an inventory sheet. By forcing a selection from an approved list, you ensure data integrity from the moment it's entered.
Strategic Application & Setup
To implement a drop-down list, you create your list of valid entries in a separate column or worksheet. Then, select the cell(s) where you want the drop-down to appear, navigate to the Data tab, click Data Validation, and under the "Allow" dropdown, choose List. In the "Source" box, you will reference the range containing your predefined options.
Example Scenario: A project management dashboard needs to track the status of multiple tasks in column C.
- Create the Source List: On a separate, hidden worksheet named "Lists," enter the statuses in cells A1:A3: "Not Started," "In Progress," "Completed."
- Apply Validation: Select the entire task status column (e.g., C2:C100) on your main sheet. Go to
Data > Data Validation. - Configure Settings:
- Allow: Select "List."
- Source: Enter the formula
=Lists!$A$1:$A$3. Using absolute references ($) ensures the source range doesn't shift.
Actionable Takeaways and Best Practices
To elevate your drop-down lists from basic to professional-grade, implement these tactical tips:
- Use Named Ranges: Instead of a static cell reference like
=Lists!$A$1:$A$3, define your list as a Named Range (e.g., "StatusList"). Your validation source then becomes=StatusList. This makes formulas more readable and simplifies updates if you move the list. - Leverage Excel Tables: Format your source list as an Excel Table (Ctrl+T). When you add a new item to the table, any data validation drop-down referencing it will automatically include the new option, eliminating manual updates.
- Keep Source Lists Separate: Always place your source lists on a dedicated, hidden worksheet. This prevents users from accidentally viewing or modifying the source data, which could break your validation rules.
2. Numeric Range Validation
Beyond simple lists, one of the most powerful excel data validation examples involves controlling numerical input. Numeric range validation restricts entries to fall within a specific minimum and maximum value, a critical function for maintaining data integrity in financial, scientific, and statistical models. This method prevents typos like extra zeros or negative values where they don't belong, ensuring that calculations based on these cells are accurate and reliable.

This validation is essential for any field that relies on quantitative data. Think of enforcing a percentage score to be between 0 and 100, limiting an age entry in an HR form to a realistic range like 18 to 70, or ensuring product quantity inputs are positive integers. By setting logical boundaries, you build a robust system that guides users and protects the dataset from corruption caused by simple human error.
Strategic Application & Setup
To set up numeric range validation, you define the acceptable boundaries directly within the Data Validation dialog box. This can be done using static numbers or by referencing other cells, creating dynamic and context-aware rules.
Example Scenario: An HR department uses a spreadsheet to track employee performance review scores, which must be entered as a percentage in column D.
- Select the Target Cells: Highlight the range where scores will be entered, for instance, D2:D150.
- Apply Validation: Navigate to the Data tab and click
Data > Data Validation. - Configure Settings:
- Allow: Select "Decimal" (or "Whole number" if fractions are not allowed).
- Data: Choose "between."
- Minimum: Enter
0. - Maximum: Enter
100.
Actionable Takeaways and Best Practices
To maximize the effectiveness of your numeric validation, go beyond the basic setup with these expert tips:
- Provide Clear Error Messages: On the "Error Alert" tab in Data Validation, create a custom message. Instead of the generic Excel error, write something specific like, "Invalid Entry. Please enter a percentage value between 0 and 100." This immediately informs the user how to correct their mistake.
- Use Formulas for Dynamic Ranges: Make your validation smarter by linking ranges to other cells. For example, if a salary input in C2 must be between a minimum (in cell G1) and maximum (in G2), set your validation minimum to
=G1and maximum to=G2. This allows you to update the valid ranges in one place. - Test Edge Cases: Always test your rules with boundary values. If the range is 0 to 100, try entering 0, 100, -1, and 101 to ensure the validation behaves exactly as expected. This helps catch any logical flaws before the sheet is deployed.
3. Date and Time Validation
Controlling date and time entries is a critical validation technique for maintaining chronological integrity and preventing illogical data. This specialized method ensures that date and time inputs adhere to specific formats and fall within acceptable ranges, which is essential for scheduling, project management, and accurate historical data tracking. It moves beyond simple text entry to enforce temporal logic, such as preventing users from setting a project deadline in the past.

This type of validation is indispensable in any scenario involving timelines. It's used for setting contract expiration dates that must occur in the future, logging employee birth dates within a reasonable historical window (e.g., 1920-2010), or scheduling meetings exclusively within business hours. By enforcing these rules at the point of entry, you build a reliable, error-free dataset for analysis and reporting.
Strategic Application & Setup
To implement date or time validation, you navigate to the Data Validation settings and choose Date or Time from the "Allow" dropdown. From there, you can set static or dynamic conditions, such as "greater than," "between," or "less than," using either fixed values or cell formulas.
Example Scenario: A project plan in column D requires that all deadlines (D2:D50) must be set for a future date, and not on a weekend.
- Select the Target Range: Highlight the cells where deadlines will be entered, for instance, D2:D50.
- Apply Validation: Go to the
Datatab, clickData Validation. - Configure Settings:
- Allow: Choose "Custom."
- Formula: Enter the formula
=AND(D2>TODAY(), WEEKDAY(D2,2)<6). This formula checks two conditions: that the date in D2 is after today's date and that the day of the week is not Saturday (6) or Sunday (7).
Actionable Takeaways and Best Practices
To maximize the effectiveness of your date and time rules, apply these advanced strategies:
- Use Dynamic Functions: Leverage functions like
TODAY()andNOW()to create dynamic validation rules that adjust automatically. For example, setting a start date "greater than or equal to"=TODAY()ensures users can't backdate entries. - Combine with Time Validation: For appointment scheduling, use custom formulas to restrict entries to business hours. A formula like
=AND(A1>=TIME(9,0,0), A1<=TIME(17,0,0))ensures the time entered in A1 is between 9:00 AM and 5:00 PM. - Provide Clear Error Alerts: In the "Error Alert" tab, provide an explicit example of the required format (e.g., "Invalid Date. Please enter a future business day in MM/DD/YYYY format."). This guides users to correct their input without confusion.
4. Text Length and Format Validation
Beyond simple values, data validation can enforce structural integrity by controlling text length and format. This is one of the most powerful excel data validation examples for maintaining consistency in fields with specific conventions like IDs, codes, or reference numbers. It prevents users from entering data that is too long, too short, or doesn't match a required pattern, ensuring that identifiers are always uniform and machine-readable.
This validation method is critical for datasets that rely on unique, formatted identifiers. Think of enforcing a standard for Employee IDs (e.g., "EMP-1234"), product SKUs (e.g., "ABC-9876"), or phone numbers. By standardizing the format at the point of entry, you eliminate the need for cumbersome data cleaning tasks later and ensure that VLOOKUPs, filters, and other functions work flawlessly.
Strategic Application & Setup
To implement text length validation, you select the cells, navigate to Data Validation, and choose Text length from the "Allow" dropdown. You can then set conditions like "equal to," "between," or "greater than." For more complex format validation, you'll need to use a Custom formula.
Example Scenario: A company's HR system requires all new Employee IDs in column B to follow the format "E" followed by exactly four digits (e.g., E1234, E5678).
- Select the Target Range: Highlight the cells where the Employee IDs will be entered, for instance, B2:B100.
- Apply Validation: Go to the
Datatab and clickData Validation. - Configure Settings:
- Allow: Select "Custom."
- Formula: Enter the formula
=AND(LEFT(B2,1)="E", LEN(B2)=5, ISNUMBER(--MID(B2,2,4))). This formula checks three conditions: the first character is "E," the total length is 5 characters, and the last four characters are numeric.
Actionable Takeaways and Best Practices
To maximize the effectiveness of your text format validation, consider these advanced tactics:
- Combine with Functions: Use functions like
UPPERorLOWERwithin your custom formulas to make validation case-insensitive. For example,UPPER(LEFT(B2,1))="E"would accept "e1234" and "E1234" as valid. - Provide Clear Input Messages: Use the "Input Message" tab in the Data Validation dialog box. For the Employee ID example, you could set a message that says, "Format Required: E#### (e.g., E1234)." This proactively guides the user and reduces entry errors.
- Use Helper Columns for Complex Logic: For extremely complex patterns (like validating a specific license plate format), it can be easier to test the logic in a helper column first. Once your formula works correctly there, you can copy it into the Custom validation rule.
5. Custom Formula Validation
Custom Formula Validation is the ultimate power-user tool in the roster of excel data validation examples. It breaks the chains of predefined rules like "Whole Number" or "Date," allowing you to define your own sophisticated logic using any Excel formula that returns a TRUE or FALSE value. This method unlocks nearly limitless possibilities, enabling you to enforce business rules, check dependencies between cells, and create context-aware validation that standard options cannot handle.
This advanced technique is essential for complex scenarios. Imagine ensuring an order total doesn't exceed a customer's credit limit, an expense entry is less than the remaining budget, or a project's end date is always after its start date. Custom formulas provide the intelligence to validate data based on other dynamic values within your worksheet, ensuring logical consistency and data integrity.
Strategic Application & Setup
To implement a custom formula, you select the target cell(s), navigate to the Data Validation dialog box, and choose "Custom" from the "Allow" dropdown. The magic happens in the "Formula" box, where you write a logical test. The formula must be written from the perspective of the first cell in your selected range and must evaluate to either TRUE (valid) or FALSE (invalid).
Example Scenario: In a project management sheet, you want to ensure the "End Date" entered in column D is always after the "Start Date" in column C.
- Select Target Cells: Highlight the range where end dates will be entered, for example, D2:D100.
- Apply Validation: Go to the
Datatab and clickData Validation. - Configure Settings:
- Allow: Select "Custom."
- Formula: Enter the formula
=D2>C2. Excel will intelligently apply this logic to each row in the selection (e.g., for cell D3, it will test=D3>C3, and so on).
Actionable Takeaways and Best Practices
To master custom formulas and avoid common pitfalls, follow these strategic guidelines:
- Use Named Ranges for Clarity: Instead of
=D2>C2, if you name the cellsEndDateandStartDaterespectively, your formula becomes=EndDate>StartDate. This is far more readable and easier to debug. - Test Formulas First: Before committing a formula to the validation rule, test it directly in a worksheet cell. Ensure it correctly returns TRUE or FALSE for various test cases. This simple step can save significant troubleshooting time.
- Provide Clear Error Messages: A generic "This value doesn't match" error is unhelpful. Use the "Error Alert" tab in the Data Validation window to write a specific message, such as "Error: The end date must be after the start date."
- Start Simple, Build Complexity: Begin with basic logical comparisons. Once you are comfortable, you can create more complex rules using functions like
AND,OR,COUNTIF, andISNUMBERto handle multiple conditions.
6. Dependent/Cascading Dropdown Validation
Dependent or cascading dropdowns represent one of the more sophisticated and powerful excel data validation examples. This system creates a dynamic, hierarchical relationship between two or more dropdown lists, where the options in one cell change based on the selection made in a previous, parent cell. It guides users through a logical sequence of choices, preventing invalid combinations and drastically improving data entry accuracy for complex datasets. This is essential for building structured forms and detailed databases.
This validation type excels in scenarios that require a guided, multi-level selection process. Common examples include selecting a Country to populate a list of States, then choosing a State to see a list of Cities. Other uses are selecting a Product Category to filter for Subcategories, or picking a Department to see a list of relevant Employees. This layered approach ensures that every piece of data entered is contextually valid.
The following diagram illustrates the fundamental hierarchical structure of a dependent dropdown system, showing how a primary selection dictates the options available at subsequent levels.
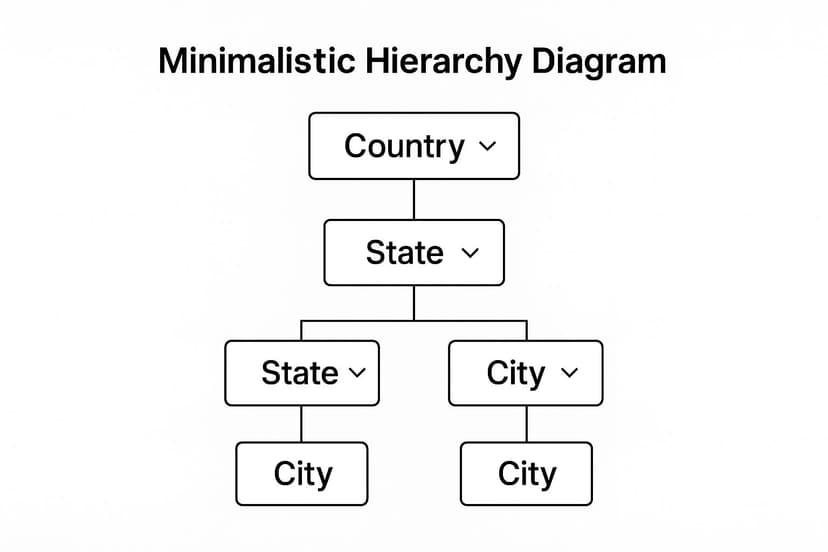
This visualization clarifies how the system works: the choice made at the "Country" level directly controls the list of available "States," which in turn determines the "City" options.
Strategic Application & Setup
Setting up dependent dropdowns requires a combination of Named Ranges and the INDIRECT function. You must structure your source data logically, where each list of dependent options is named to match an entry in the parent list.
Example Scenario: An address form needs users to select a Country (Cell A2), then a corresponding State/Province (Cell B2).
- Create the Source Lists: On a "Lists" worksheet, create your primary list (e.g., USA, Canada in C1:C2). Create separate lists for the dependent options, titling each list with the exact name from the primary list (e.g., a list named "USA" containing California, Texas; a list named "Canada" containing Ontario, Quebec).
- Define Named Ranges:
- Select the primary country list (C1:C2) and name it "CountryList".
- Select the list of US states and name it "USA".
- Select the list of Canadian provinces and name it "Canada".
- Apply Validation:
- Primary Dropdown (A2): Go to
Data > Data Validation. Allow: List, Source:=CountryList. - Dependent Dropdown (B2): Go to
Data > Data Validation. Allow: List, Source:=INDIRECT(A2). TheINDIRECTfunction will look at the value chosen in A2 (e.g., "USA") and use the Named Range with that same name as its source.
- Primary Dropdown (A2): Go to
Actionable Takeaways and Best Practices
To master dependent dropdowns and ensure they are robust and user-friendly, focus on structure and scalability.
- Standardize Naming Conventions: The dependent list's Named Range must exactly match the item in the parent list. Avoid spaces or special characters in your parent list items to prevent issues with Named Ranges (e.g., use "NewYork" instead of "New York").
- Use Tables and Structured References: Format each dependent list as an Excel Table. This allows you to use structured references within your Named Ranges, making them dynamic. When you add a new state to the "USA" table, the dropdown will update automatically.
- Provide Clear User Instructions: Add a comment or an Input Message in the Data Validation settings to guide users. For example, in the State cell, the message could say, "Please select a country in the previous column first."
- Plan for Expansion: Before building, map out your full data hierarchy. This foresight helps you structure your source lists and Named Ranges in a way that is easy to modify and expand as your data needs grow.
Excel Data Validation Methods Comparison
| Validation Type | Implementation Complexity 🔄 | Resource Requirements ⚡ | Expected Outcomes 📊 | Ideal Use Cases 💡 | Key Advantages ⭐ |
|---|---|---|---|---|---|
| Drop-down List Validation | Low – Easy to set up and modify | Low – Minimal resources needed | Standardized data entry, reduces typing errors | Selecting from predefined options e.g., departments, status | User-friendly, speeds data entry, ensures consistency |
| Numeric Range Validation | Low to Medium – Define numeric limits | Low – Basic numeric criteria | Prevents unrealistic or invalid numeric data | Validating ages, percentages, salaries, quantities | Maintains data integrity, regulatory compliance |
| Date and Time Validation | Medium – Requires format and range setup | Low to Medium – Date/time functions | Ensures consistent chronological data | Scheduling, deadlines, birth dates, historical data | Prevents invalid dates, supports international formats |
| Text Length and Format Validation | Medium – Pattern and length configuration | Low – Uses built-in text rules | Consistent formatting of IDs, codes, and text | Employee IDs, phone numbers, license plates | Enforces format consistency, essential for databases |
| Custom Formula Validation | High – Needs advanced formula knowledge | Medium to High – Formula complexity | Supports complex, multi-condition validation | Budget limits, credit checks, schedule constraints | Unlimited flexibility, supports sophisticated rules |
| Dependent/Cascading Dropdown Validation | High – Complex setup of linked dropdowns | Medium – Requires structured data | Guided, hierarchical data entry | Multi-level selection e.g., Country → State → City | Reduces errors, improves user experience, maintains hierarchy |
From Validation to Automation: Your Next Steps
We've journeyed through a comprehensive set of Excel data validation examples, moving from fundamental controls to sophisticated, dynamic systems. This exploration wasn't just about learning rules; it was about building a strategic framework for data integrity that protects your work from the ground up. By mastering these techniques, you transform Excel from a simple spreadsheet tool into a robust, error-resistant data management environment.
The key takeaway is that data validation is a proactive, not reactive, discipline. It's about designing systems that prevent errors before they ever happen, saving countless hours of future cleanup and debugging. Each example we covered serves a distinct strategic purpose, working together to create a comprehensive defense against inaccurate data.
Recapping the Core Strategies
Let's distill the strategic value from each of the examples we explored:
- Dropdown Lists: These are your first line of defense for standardization. They eliminate typos and enforce a controlled vocabulary, which is essential for consistent reporting and analysis.
- Numeric & Date Ranges: These validations act as powerful guardrails. They ensure that financial figures, project timelines, and other critical metrics stay within logical, predefined boundaries, preventing nonsensical or impossible entries.
- Text Length & Format: This is about enforcing structural integrity. Whether it's a project ID, a customer code, or a phone number, this validation ensures that text-based data conforms to the required format, making it reliable for lookups and system integrations.
- Custom Formulas & Cascading Dropdowns: This is where you elevate your spreadsheets from static forms to interactive applications. These advanced techniques allow you to build intelligent, context-aware validation logic that adapts to user input, guiding them to make correct choices and preventing complex relational errors.
Strategic Insight: True mastery of Excel data validation isn't just about knowing how to set up a rule. It's about understanding why you're setting it up and how it fits into your broader data quality strategy. Each rule is a building block in a fortress designed to protect the accuracy and reliability of your information.
Your Actionable Path Forward
Moving beyond this article, your goal is to integrate these principles into your daily workflows. Don't just admire the Excel data validation examples; apply them. Start by identifying the most critical data entry points in your most-used spreadsheets. Which columns are most prone to errors? Which fields drive your key reports?
Begin by implementing simple dropdown lists and numeric constraints. As you gain confidence, challenge yourself to build a cascading dropdown system or write a custom formula to solve a unique business problem. The more you practice, the more intuitive it will become to build error-proof worksheets from the start.
Ultimately, the journey from manual validation to intelligent data management culminates in automation. While setting up these rules manually is a crucial skill, modern tools can amplify your efforts, especially when dealing with large or complex datasets. This is where AI-powered assistants become invaluable, helping you prepare data, generate complex formulas, and audit your work at a scale and speed that is impossible to achieve manually. This frees you up to focus on higher-level analysis and strategic decision-making, confident that your underlying data is sound.
Ready to supercharge your Excel workflows and move from manual setup to intelligent automation? Discover how Elyx.AI can help you generate complex formulas, clean and prepare your data, and streamline the very processes you've learned about today. Visit Elyx.AI to see how our AI-powered assistant can become your essential partner in achieving flawless data management.
Reading Excel tutorials to save time?
What if an AI did the work for you?
Describe what you need, Elyx executes it in Excel.
Sign up